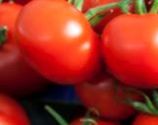
 As a rule, the brighter the color of a food, the more concentrated its nutrition. The bright hue of red foods signals lots of nutrition in every bite. Red fruits and vegetables are high in vitamins and minerals, which help turn carbohydrates, fats and proteins into usable energy for the body. These foods also contain antioxidants, which protect DNA from oxidative damage and, therefore, prevent disease. Scientists believe there are still thousands of plant phytochemicals, health-promoting plant substances, that have not been identified. Phytochemicals, including some familiar ones found in red foods--flavonoids, lycopene and resveratrol--have been only partially studied for their health benefits.
Tomatoes Tomatoes are an all-around superfood. Eaten alone, in salads, or in sauces, they are low-calorie and packed with nutrients. Tomatoes come in a number of shapes, sizes and varieties (and colors). Red tomatoes contain high levels of lycopene, a relative of beta-carotene, which appears to help fight cancers of the esophagus, prostate and stomach. Lycopene is most abundant in cooked tomato products, such as tomato and pizza sauce, and stews, chili and soups. Tomatoes are also rich in potassium, which is important for heart health. In addition, they contain Vitamin C, which helps support skin integrity and immunity. Red Peppers Raw, grilled, steamed or sauteed, peppers add flavor and color to dishes. They contain high levels of potassium, which supports digestive and heart health, as well as Vitamin A, which is key for good vision. These red vegetables are popping with Vitamin C, which again, helps wipe out disease-causing bacteria. Hot red peppers contain capsaicin, a phytochemical that may fight bacteria through its most notable property--heat. Strawberries Strawberries are low-calorie and loaded with Vitamin C, potassium and folate. The World Dental website says that strawberries may help whiten teeth. The malic acid in strawberries is an effective dental cleaner when mixed with baking soda. Apples Apples are another highly versatile and portable food. They can be baked into pies, mixed into salads, added to yogurt and cereal, or eaten whole. Apples are rich in pectin, a soluble fiber that helps bind LDL cholesterol and send it out of the body. This fruit also contains other heart-healthy substances, such as flavonoids, which are thought to combat free-radical damage to artery walls. Apples come in a number of colors and are all nutritious. Red Kidney Beans A red food that does not immediately come to mind but that still deserves a place on the list is kidney beans. They contain not only large amounts of heart-healthy fiber, but zinc, which supports reproductive health and wound healing. Kidney beans also contain B vitamins, which are key for neurological function. Kidney beans, like their legume cousins, also contain potassium and folate. Watermelon Like tomatoes, watermelon contains cancer-fighting lycopene. It also contains Vitamin A and plenty of Vitamin C. Watermelon is low calorie and can be eaten as a dessert or blended into a rich, sweet juice. Seedless varieties make it easy to enjoy almost anywhere. Pomegranates Pomegranates are delicious and, in recent years, have found their way into supermarkets in a variety of products--everything from the pomegranate fruit itself to pomegranate juice to other pomegranate products. Pomegranates have received attention for their high antioxidant content, but their greatest asset may be their high potassium content. Cranberries The tart cranberry is filled with Vitamin C. Today, dried cranberries have joined the ranks of portable snacks and can be purchased as easily as nuts and raisins. Cranberry juice is notable for its high acidity, which can prevent yeast infections in some women. Raspberries Fresh raspberries' greatest asset is their high fiber content. Raspberries also contain considerable quantities of potassium, zinc and niacin. Raspberries are under study for certain phytochemicals that may prevent cancer. Cherries The deep color of cherries highlights their nutritional content. They contain potassium, calcium and antioxidants. Opt for fresh cherries, however. Avoid the artificially colored sweetened cherries. Red Food Power Many whole foods that are red are naturally low-calorie, low-sodium foods. Two other red foods that are healthful, but do not make the "top ten" list due to certain drawbacks, are red wine and lean red meat. Red wine contains resveratrol, the phytochemical, which appears to be a powerful, heart-healthy antioxidant. The U.S. Department of Agriculture recommends that healthy women limit alcoholic drinks to one a day, and for men, two a day. While wine contains salubrious substances, alcohol in general seems to raise the risk of certain types of cancer, including breast and oral cancers. Lean red meat is loaded with iron and protein, which make it a great food choice. Red meat intake, however, should be limited, since excessive intake has been linked to colon cancer. Red foods showcase the nutritional power of a plant-based diet. When choosing red foods, choose those that are whole foods like fruits, vegetables and legumes, and limit red foods that get their red color through dyes and processing. Read the labels of red chips, packaged snack foods, cakes and other foods that appear unnaturally red. Processed red foods are likely to contain potentially harmful substances as well as other undesirable additives, such as fat, sugar and sodium. By: Christen Cooper, M.S.,R. "10 Healthiest Red Foods" LIVESTRONG.com, 10/03/17.
1 Comment
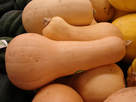 As Americans, squashes in their many and varied forms have been a part of our diet since the earliest times. The butternut squash is one of the bewildering assortment of squashes listed in the seed catalogs. Butternut squash is a selection of Cucurbita moschata, one of four New World species in the pumpkin – squash – gourd complex that have been cultivated by Native Americans for at least 6,000 years. These species interbreed promiscuously, and the origins of individual forms is murky. This species possibly originated in Argentina but was being grown in North America by the time European exploration commenced in the 16th century. Butternut is a winter variety, one of the squashes with hard exterior shell and large, hard-shelled seeds. Because of their thick rind they can be stored for several months unlike their relatives, the thin skinned summer squash. Butternut is the tan colored, elongated, smooth skinned squash with a swollen base. It and the familiar acorn squash are the two most common winter squashes seen in groceries. In the garden, it grows as a sprawling vine similar to its cousin the pumpkin, but without so much exuberance. Unlike the summer squash, which are harvested every few days to assure their succulence, winter squash are allowed to remain on the vine until the fruit develop the thick skin late in the season.it grows as a sprawling vine similar to its cousin the pumpkin, but without so much exuberance. Unlike the summer squash, which are harvested every few days to assure their succulence, winter squash are allowed to remain on the vine until the fruit develop the thick skin late in the season. As the holiday season arrives and the pumpkin pies are wafting their fragrance from the oven, a discussion of this all-American food seems appropriate. Pumpkins and the odd assemblage of squashes represent one of the three food crops cultivated by Native Americans at the time of European arrival. The others were corn (maize) and beans. The whole world quickly embraced corn and beans as staples, but pumpkins and squash never caught on in the rest of the world like they did here. Pumpkin pies can be made from either winter squashes or from the more traditional pumpkin. In fact, the first pumpkin pies were made using hard shelled pumpkins that had a squash-like look. The earliest mention of a desert made from pumpkins was by Massachusetts Pilgrims soon after their landing in 1620. Their method of preparation was to remove the top of a pumpkin, scoop out the seeds and then fill the cavity with sliced apples, sugar, spices and milk. The thick-skinned fruit was then baked in wood ashes until it was done. By 1673, the "Pumpion-Pye" had progressed to a kind of griddle cake with eggs added. In a 1796 cookbook, the pumpkin pie in its current form with a proper pie crust was described. Orange-fleshed butternut squash are not usually used to make pumpkin pies, but they could be. Mostly, they are split and baked with spices and butter added for seasoning. This method is little changed from how the Pilgrims would have prepared the dish, except they didn’t have a microwave. Butternut squash are warm season vegetables planted in hills spaced two feet apart in wide rows. Being intended for harvest at the end of the season, planting can be delay until June. Squash bugs are a serious problem with all squash. Scouting for the clusters of shiny brown eggs on the leaves is an early warning system important in control. Removing the eggs will help, but it’s hard to get them all. When young insects are first spotted, they should be dispatched with an appropriate spray while still young. By: Gerald Klingaman, retired
Extension Horticulturist - Ornamentals Extension News - December 9, 2005 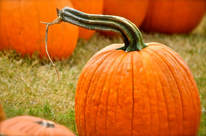 Latin: Cucurbita pep0 The pumpkin is as American as apple pie, yet its current status is a result of our diverse cultural heritage. The word pumpkin is derived from the middle English word "pumpion" which described a type of Old World melon. The pumpkins and squashes are thought to have originated in Central America and Mexico. They spread as Native Americans adopted them as a staple food over 9,000 years ago. Among the New England tribes these plants were described as "askutasquash." The Puritans of New England adopted "pumpion" for the large, orange-fruited vines and "squash" for all of the smaller-fruited edible sorts. Botanically speaking, pumpkins and squashes are kissing cousins belonging to the cucumber family. They are so closely related that pumpkins and some squashes will readily cross pollinate one another. If a non-pumpkin type pollinates a pumpkin flower, the resultant fruit will look like a normal pumpkin, but if seeds are saved and planted the next season, the fruit of the hybrid plant will be mongrelized. The acceptance of pumpkins by early colonists was not immediate. In fact, it took a good long New England winter to convince them that they were indeed tasty and nutritious. One of the earliest methods of preparing pumpkins was to cut a hole in the top, scoop out the seeds, and then fill the cavity with apples, molasses, spices and milk. The top was put back on and then the pumpkin was baked in a bed of coals. By the late 1700's, the standard method of preparing pumpkin, other than pumpkin bread, had become our standard pumpkin pie, which included eggs, molasses, allspice and ginger baked in a tart shell. The tradition of the jack o' lantern is interwoven with the traditions of the ancient Celts who celebrated a ceremony that apparently was part harvest ceremony and partly a ceremony to appease the spirits of the dead. This ritual included carrying lighted embers from ceremonial bonfires in carved out turnips -- a readily available ember-holder. Faces were carved on these turnips to scare off the spirits of the dead that came back to visit earth -- often in the form of black cats. In the 1750s, the old Irish folktale was written down, but changed to include a night watchman named Jack. The Irish potato famine a century later resulted in the immigration of over 600,000 Irish men and women to the United States. Finding few big turnips to carve, the pumpkin was adopted for Jack's lantern for the Christian All Hallows Eve festival. That holiday evolved into our nonsecular Halloween. Gardeners wishing to grow pumpkins need to first assess their goal. If the goal is to grow pumpkins for pies, one of the small fruited pie types such as Small Sugar or Jack-Be-Little are best. But if the goal is to grow a good carving pumpkin, say something in the 20 to 30 pound range, selections such as the old Connecticut Field or Jack o' Lantern are hard to beat. If the goal is to grow giant pumpkins for county bragging rights, Dill's Atlantic Giant, which occasionally will top 600 pounds, is for you. Pumpkins require 100 to 115 days to mature fruit and are usually planted after the soil warms in the spring from mid May until late June for jack-o-lanterns. By: Gerald Klingaman, retired
Extension Horticulturist - Ornamentals Extension News - October 30, 1998 Special Encore - October 24, 2008  Fresh herbs add pizzazz to any meal. You can use your garden-fresh herbs all year with one of these easy techniques. FREEZING Freezing preserves essential oils that give herbs their flavor. Freezing herbs is easy. There's no need to blanch them; just rinse, remove the leaves from the stems and let them dry on a flat tray. You can put a bunch of these leaves together in a bag to freeze them. You'll end up with a clump of herbs that you can cut up and add to sauces, soups, ect. You can also freeze the leaves individually first on a flat tray (like a cookie sheet) and then place them in a plastic bag; when you open the bag later you can pick out as many individual leaves as you like. Another great method is to blend the herbs with oil to make a paste, which you then freeze in a plastic container, bag or in ice cube trays. You can freeze just one type of herb, such a basil, or make your own blend, such as oregano, thyme, parsley and sage. DRYING Some herbs, such as oregano, sage and thyme, can be air dried. Just hang small bunches in a well ventilated room, away from light. When leaves are dry, remove them from their stems and store in an airtight jar. Unless you live in a very arid climate, herbs such as basil or parsley, which have thick succulent leaves, are better dried in a dehydrator. Once dry store them in an airtight container. Whatever method you choose, be sure to harvest herbs after the flower buds appear
but before they open. That way, you'll be sure to get the highest concentration of essential oils. Early morning is the best time to pick your herbs, after the morning dew has evaporated but before the sun gets too hot. By: Kathy LaLiberte 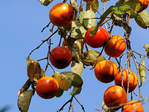 I’ve always suspected that possums have that smirky grin because they are fantasizing about the coming persimmon feast. Country folk enjoyed the persimmon too. The mushy native fruit was a diversion from their humdrum diet. Our old friend, the persimmon, is a botanical trickster and folk who have fallen victim to its puckering ways hold grudges. The alternately arranged, ovate leaves are four to six inches long and gray-green in color. They may turn a yellow-brown in the fall but color production is unreliable. The bark of old trees is blackish with square, reptilian plates that give trees a handsome winter appearance. Persimmon flowers are white to yellow-green with four petals and sepals. Usually plants are dioecious with either male or female trees, but sometimes flowers of both sexes are found on the same tree. The flowers are not especially showy being small and mostly obscured by the leaves that emerge first. Considerable variability exists in persimmon fruit as to size, color, time of ripening and sensory characteristics such as texture, taste and sweetness. Four large sepals reflex from the top of the fruit, which is yellow, golden or orange in color and covered with a waxy bloom. The usual fruit is about the size of a golf ball-and according to non-believers -- about as tasty. Fruit ripening occurs from September through November with fruit hanging on the tree until early winter. Since the time of the rapid western expansion following the Civil War, agriculturists have been predicting that the persimmon is just on the verge of becoming an important fruit crop. But, alas, it didn’t happen then and it still hasn’t happened. It probably never will. While the Japanese and Chinese have developed over 1000 cultivars of a closely related species they call "kaki," only a few improved selections have been made of our native species. The first European to come into contact with the persimmon was Hernando DeSoto when he crossed the Mississippi River near Memphis in 1541. He found dried fruit and loaves of bread made from persimmon at the ancient Indian village of Casqui which is now the Parkin Archeological Park. Captain John Smith, the founder of the Jamestown colony in Virginia in 1607, wrote of the persimmon: "If it not be ripe, it will drawe a man’s mouth awrie with much torment. When it is ripe, it is deliscious as an Apricock." A uniquely Ozarkian legend has it that one can prophesy the severity of the coming winter by inspecting the seeds of the persimmon. Seeds are cut lengthwise to reveal the embryo suspended in a field of white endosperm. If the embryo is shaped like a knife, it will be a bitterly cold winter. If the embryo is spoon shaped, expect lots of snow. If it is fork shaped, a normal winter is in store. While most consider such prophecies as unfounded superstition, there may be some basis for the observation. If one assumes that summer weather patterns are a predictor of winter weather conditions, it is not illogical to reason that morphological changes could be reflected in the embryos of seeds formed during those summer months. About a dozen cultivars of persimmon are described and a few specialist nurseries offer them over the Internet or through their mail order catalogs. In the garden the persimmon is easily accommodated in about any sunny site. The fall webworm that produces the dirty gray webs in persimmons every fall are more ugly than harmful, a fact you should remember when they invade your tree. By: Gerald Klingaman, retired
Extension Horticulturist - Ornamentals Extension News - October 11, 2002 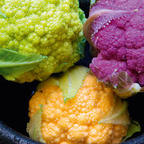 We’ve all been admonished to eat our vegetables, and sometimes we even follow that sage advice. I’m a big fan of most vegetables and especially like cabbage, broccoli, kale and Brussels sprouts, but their pale cousin, cauliflower, has been harder to warm to. But the world, she is a-changing, and the white curds of cauliflowers are now available in designer shades. Cauliflower is closely related to broccoli, both being members of the crucifer family and classified as Brassica oleracea Botrytis Group. All of the crucifers – everything from cabbage to kohlrabi – are native to the Mediterranean region and derived from ancestral wild cabbage that still grows in the region. Over the past 4,000 years, variants of the wild species have been selected and modified by farmers in what is one of the first examples of extreme genetic modification. Like other crucifers, cauliflower is a biennial. To get it to flower plants must go through a winter with the typical 4-petaled yellow or white flowers produced on elongating shoots in the spring. However, cauliflower is a more temperamental crucifer than most. It is the most freeze sensitive of the crucifers and also intolerant of heat and drought. The edible head (curd) of cauliflower is formed from fused flowers. White curds are the typical form and have been described in early writings since at least 600 B.C. The now war-ravage country of Syria was the source of some of the first forms of cauliflower grown in Spain that eventually spread to the rest of Europe. Early Italian cauliflower cultivars have included color variants but it was not until 1970 with the chance discovery of an orange-headed mutation in a Canadian cauliflower field that the story of the modern colored forms began. A sample was collected of the plant, it was propagated and eventually made its way to the National Vegetable Research Center in England. Researchers there knew of the interest Michael Dickson, a Cornell University crucifer breeder working with cauliflowers, so they sent him samples. In 1989 Dickson released the orange headed breeding lines to commercial vegetable seed companies. The orange clone Cheddar was released in 2004. Orange cauliflower has a high vitamin A content. Green cauliflower lines began appearing about 1990 and contain low concentrations of chlorophyll in the curd to produce the green shading. The purple cauliflowers rely on the anthocyanin pigment found in red cabbage to provide its color. Cauliflower is low in calories and carbohydrates, making it a substitute for starchy foods such as potatoes, rice and pasta. Cauliflower can be grown as a spring or fall crop in Arkansas. Seeds are started indoors in the winter with the planting date delayed until about two weeks before the anticipated last frost date. White curded cultivars such as Snowball mature in about 10 weeks, so they should finish before the worst of the summer heat. Fall crops can be planted in August but careful attention must be paid to watering to assure success. For best results a uniform moisture and fertility regime must be maintained to assure successful production. Some cauliflower clones are said to be “self-blanching,” a reference to the fact that the uppermost leaves curve inward and shield the developing curd from the direct rays of the sun. For older cultivars blanching is done by tying together the uppermost leaves in a loose bunch when the curd is 2-3 inches across. This reduces the chance of sunburn and prevents the development of chlorophyll, which can lead to an off taste. Blanching is more important for the spring crop than the fall crop. Being a crucifer, cauliflowers are plagued by a number of diseases and insect pests. The cabbage looper is the most serious insect pest and early infestations can result in serious defoliation, which reduces curd development. BT, an organic insecticide, has proven effective in controlling this pest.
For more information about horticulture or to see other Plant of the Week columns, visit Extension's Web site, www.uaex.edu, or contact your county extension agent. The Cooperative Extension Service is part of the U of A Division of Agriculture. 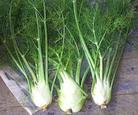 The best garden plants are easy to grow and satisfy specific needs; plus, they look good. Fennel (Foeniculum vulgare) is one of the best garden plants because it is attractive, easy to grow and satisfies lots of very specific needs. You can eat it, it is a good weaver plant in the perennial border and it hosts the caterpillars of the eastern black swallowtail. Fennel is an upright-growing perennial herb of the carrot family growing to 6 feet tall, which produces a number of hollow stems from a deep, taprooted crown. Its leaves are finely dissected to 16 inches long and terminate in threadlike filaments. The most common form, the bronze fennel (variety Purpureum), has maroon/bronze leaves, which give the plant a smoky-like look. All parts of the plant have a licorice-like scent when crushed. Florence fennel of the Azoricum Group grows only 3 feet tall and produces a cluster of swollen leaf bases that form a bulb-like swelling at the base of the leaf. This fennel is grown as an annual crop, with the “bulbs” harvested while succulent and sweet. This is eaten as a cooked vegetable and is often found in U.S. markets under its Italian name, finocchio. Yellow flower clusters in flat-topped umbels to 3 inches across appear in midsummer near the ends of the stems. Individual flowers are tiny and give rise to a single “seed,” which has culinary uses. Fennel is a Mediterranean plant that is now found naturalized throughout the world, especially in areas such as California, which has a similar climate. Its leaves are used as a flavoring similar to dill weed when cooking fish, and as an ingredient in stuffing recipes. Its seeds are a favorite in Italian cooking. In garden design, fennel is an excellent addition to the vegetable garden or the mixed perennial border. Though it can reach considerable height, its deep taproot and finely dissected leaves make it a good neighbor, and other plants can grow next to it without being crowded out. Plants are hardy from zones 5 through 9, making it one of the most cold-hardy members of this genus. Fennel is a must-have plant if the aim is to attract butterflies into the garden for it. Along with carrot, dill, parsley and Queen Anne’s lace, fennel is a preferred food plant for the caterpillars of the eastern black swallowtail. The caterpillars are two inches long, with concentric rings of black and yellow. They are voracious feeders and can strip young plants of most of their foliage, but fennel is tough enough — it responds by sending out a fresh supply of leaves.
Fennel requires sunny, well-drained soils but seems to tolerate both alkaline and acidic sites. It has good drought tolerance late in the year, but needs moisture during establishment to ensure the formation of a strong root system. Once established, fennel can be long-lived in the garden. Plants are semi-evergreen and serve as sites for overwintering eggs of the swallowtail butterfly. By: Gerald Klingaman, retired Retired Extension Horticulturist - Ornamentals Extension News - September 16, 2011  In a botanical sense, an herb is a plant that does not produce a woody stem and dies back to the ground each winter to a perennial root system. In the garden sense, herbs are plants that serve as a major source of seasonings in food preparation. In an even broader sense, herbs include plants that are also useful for scents in cosmetics or for medicinal purposes. Some of them are woody and out step the definition of a herbaceous plant. For American pioneers, herbs were the major source of seasonings for foods. They were also used for curing illnesses, storing with linens, strewing on floors, covering the bad taste of meats before refrigeration was devised, dyeing homespun fabrics, and as fragrances.
With the advent of the supermarket, growing herbs in the garden declined because a wide range of dried herbs became available in stores. Now, however, with an increase in the popularity of ethnic foods, combined with a realization that fresh herbs have more distinctive tastes than some dried herbs, more gardeners are growing at least a few herbs for fresh use, drying or freezing. Increasing interest in herbal medicine also has helped make herb growing more popular. In addition, some herbs are ornamental. General Culture Most herbs are easy to grow, but you must select the proper location to grow them. Most herbs need a sunny location, and only a few, including angelica, woodruff and sweet cicely, are better grown in partial shade. The oils, which account for the herbs' flavor, are produced in the greatest quantity when plants receive six to eight hours of full sunlight each day. If you don't have a good, sunny location, many herbs will tolerate light shade, but their growth and quality will not be as good. Soil Herbs will grow in any good garden soil. The soil should not be extremely acid or alkaline; a soil nearly neutral is best for most herbs. A pH between 6.5 and 7.0 produces the best herbs. Herbs grow best when soils have adequate organic matter. Most herbs do not require highly fertile soil. Highly fertile soils tend to produce excessive foliage that is poor in flavor. In preparing average soils, incorporate 4 inches of peat moss or compost into the garden area to improve soil condition and help retain moisture. Drainage When selecting a site for an herb garden, you must consider drainage. None of the important herbs grow in wet soils, but a few, such as mint, angelica and lovage, thrive in fairly moist soils. If the only area available is poorly drained, you need to modify the area. Build raised beds or install underground drainage tiles to grow herbs successfully. Preparation Once you select a site, cultivate the soil to a depth of 12 to 18 inches, then level it. If only a shallow layer of topsoil exists above hard subsoil, remove the topsoil temporarily. Break up the subsoil, adding organic matter. After improving the subsoil, put it back. Even though the topsoil may be better than the subsoil, the topsoil may also need additional organic matter. Pests Few insects or diseases attack herbs. In some localities, rusts infect mints. In hot, dry weather, spider mites damage some herbs. Aphids attack anise, caraway, dill and fennel. Grasshoppers and certain caterpillars attack herbs when conditions are right. Control is usually not necessary until you notice a problem. If control is warranted and pesticides are used, make certain they are labeled for food crops if the herbs are to be used for culinary purposes. Propagation From Seeds You can grow many herbs from seeds. If possible, sow the seeds in pots or flats indoors in late winter. They need a sunny window and cool temperatures (60 degrees F) for best growth. Treat young plants for the garden just as you would treat young salvia or pepper plants. Because some plants take longer than others to develop, start those with smaller seeds first, preferably in February. You may later transplant them into individual pots and plant them in the garden after danger of frost is past. The finer the seeds, the shallower you should sow them. A few herbs do not transplant well. Sow them directly into the garden. Plant anise, coriander, dill and fennel directly in the garden and don't transplant them. For direct seeding outdoors, plant in spring after all danger of frost is past and the soil is beginning to warm up. Make the soil into a fine, level seed bed. As a general rule, sow seeds at a depth of twice their diameter. Propagation From Cutting, Division and Layering Some established herbs multiply asexually by cutting, division or layering. Layering is suitable for many perennials with flexible branches. Division works well for tarragon, chives and mint. Lavender, lemon balm, scented geraniums, sage and rosemary can be propagated from cuttings. You can take cuttings of herbs any time during late spring and summer from healthy, well-established plants. Cuttings taken in fall take longer to root. Healthy tip growth makes the best cuttings. Cuttings of vigorous soft shoots or old woody stems are less desirable. Cut just below a node to form a cutting that is 3 to 5 inches long. Most herbs should root in two to four weeks. After rooting, overwinter them indoors in pots in a sunny window or in a cold frame. Plant them outdoors in a permanent location the following spring. Division is useful for multiplying healthy, established plants that may be two to four years old. Division allows modest increase for plant like chives, mints and French tarragon. Divide herbs in early spring before growth begins. Dig up the old plant and cut or pull it apart into sections. Replant the sections and keep them moist until the new plants are established. Layering is the simplest and most reliable method to increase perennial herbs such as thyme, lemon balm, winter savory, sage, bay and rosemary. The basic principle is to produce roots on a stem while it is still attached to the parent plant. After you root the stem, detach the new plant from the parent. Select a healthy branch that is growing close to the ground and that is flexible enough to bend down to the soil. While holding the branch close to the soil, bend the top 6 to 10 inches of the stem into a vertical position. It may be helpful to scrape the bark on the underside of the branch at the bend. Bury the bent, scraped portion 3 to 6 inches deep, and anchor it with a wire loop. Insert a small stake to hold the top upright. Water thoroughly. You can layer anytime from spring to late summer. Allow the rooted shoot to remain in place until the following spring. Then cut it from the parent plant and plant it into the desired location. Winter Protection Many herbs suffer winter damage in our climate, so some winter protection for perennial herbs is advisable. Many herbs have shallow roots that heave out during spring thawing and freezing of soil. A loose mulch spread over the roots about 4 inches deep can provide adequate protection. Evergreen boughs, straw or oak leaves are good materials for a mulch. Don't mulch until after the ground is frozen in early winter. Do not remove mulch until you see signs of new growth in the early spring. If the mulch compacts during the winter from heavy snows, fluff it up in early spring before growth begins. Harvesting Herbs Depending on the herb, harvest may include one or more plant parts. In most cases you harvest the leaves, but in some cases you pick flowers, seeds or roots. Handle blossoms just as you would handle leaves. Often, you harvest blossoms with the leaves and mix them together. Dried herbs lose quality in two to three years. Discard them if you haven't used them in that time. Leaves To determine the best harvest time for each herb, you need some experience. However, a few general rules can lead you in the right direction for most herbs. Harvest the leaves when they contain the optimum amount of essential oils. These oils give herbs their special flavor or scent. Ideally you should cut herbs soon after the dew has evaporated from the leaves in the morning. Harvest on a dry day that has been preceded by at least two sunny days. In most cases, cut stems for harvest when the flower buds are just beginning to open. Mints, however, have the most oil in the leaves when the spikes are in full bloom. When gathering a large quantity of herbs, use an open-weave basket or containers that allow good air movement. Don't stuff herbs into plastic bags, which can heat up and cause rapid deterioration of herbs. Never cut more stems than you can conveniently dry at one time. You can cut back a perennial herb to about half its height and can cut down an annual to a few inches. You can also remove an annual completely near the end of the season. Wash the plants in cool water immediately after gathering and spread them on towels. Pat them gently with a towel until dry. A dark, well-ventilated room where temperatures run between 70 and 90 degrees F is an excellent room for drying. Air conditioning is helpful, because it reduces humidity in the air. You can use frames covered with cheesecloth or other netting, or metal window screens with cheesecloth laid on top for drying. Prepare the frames or screens before you cut the plants. For some herbs, you strip the leaves from the stems before drying. Herbs in this group include basil, dill, lemon balm, lovage, mint, sage, lemon verbena and tarragon. Spread these leaves in single layers for quickest drying. Herbs with smaller leaves can be dried on the stems. These herbs include thyme, summer and winter savory, rosemary, oregano and marjoram. Strip the leaves after drying is complete. Herb leaves should dry in three to four days under proper conditions. In humid weather, you may need to spread the herbs on a cookie sheet and dry them in an oven at about 125 degrees F for a few minutes before placing them in an airtight container. Some herbs do not dry well at home. Instead, you can freeze them. Handle them as you would for drying. Then after washing, blanch them in boiling, unsalted water for 50 seconds, cool quickly in ice water and blot dry. Spread them in a single layer on paper or cookie sheets and place them in the freezer. You can freeze dill, chives and basil without blanching. After the herbs are frozen, place them in airtight plastic containers or bags. Roots Angelica and lovage produce usable roots. Dig these roots in the late fall or early spring. Wash them thoroughly after digging. Then slice or split the large roots. Place the pieces in thin layers on screens and turn the slices several times a week. After they are partially dry, finish them in an oven at low heat before placing them in an airtight container for storage. It may take roots six to eight weeks to dry completely. When dry, the root piece should snap when you bend it. Seeds You can grow and process seeds of dill, caraway, fennel and anise at home. When the plants begin to mature and yellow, cut the heads of the plants containing the seeds, leaving a short stem. Place them on a drying tray for five or six days. Then the seeds should fall fairly easily from the heads. Remove the chaff, and allow the seeds to continue to dry for another week. Stir them frequently. Store seeds in airtight jars after complete drying. Source: University of Missouri Extension Web site http://extension.missouri.edu/p/g6470  The search for a magic cure for what ails you is alive and well in America. This search is as old as mankind and seems to have been only slightly blunted by the rise of modern medicine and a better understanding of disease. In the 16th century America became the new corner drug store for Europe. Tobacco and sassafras were the most important early medicinal plants. One went on to infamy and riches while the other ended up spawning a chain of drive-in restaurants. Sassafras, Sassafras albidum, is a member of the laurel family and is native in much of the eastern woodlands, including all of Arkansas. In the northern part of its range it grows as small trees while in the South it may become 80 feet tall. However, we usually see it as a mid-size tree growing in thickets. The aromatic, slightly blue-green leaves are mitten shaped and can be up to six inches long, two-lobed or elliptical with no lobes. In the fall they change to shades of yellow, orange or red. Yellow-green sassafras flowers appear in late April before the leaves appear. Plants are dioecious with individuals being either male or female. The plant is somewhat shy about fruiting, but when it does so the dark blue, pea-size berries are borne singly atop a bright red peduncle. From the profile, the fruit and peduncle looks like a miniature ice cream cone.
Sassafras is aromatic, giving off a fragrance somewhere between that of oranges and vanilla when crushed. The fragrance comes from safrole, which is at the highest concentration in the roots. Until recent advances in medicine, healers always associated strong fragrances with curative powers. The aromatherapy movement uses the same principles practiced centuries ago by ancient Egyptians and early American Indians. When European explorers first landed on the new continent, they were quick to adopt the native use of the plants they found. About 1560 the French Huguenot settlement on the Saint Johns River in Florida first learned of sassafras from the tribes they encountered. When the Spanish captured the French settlement, they learned of sassafras from the few survivors. In 1571 the Spanish physician and botanist Nicolas Monardes published his book Joyfull Newes Out of the Newe Founde Worlde (from the English translation that appeared in 1577), and sassafras became the latest miracle cure. The first shipment of sassafras went to England in 1602, and during much of the 17th century it was one of the principle New World exports. The Cherokees used the plant to cure everything from ague to venereal disease, including "overfatness." But by the 19th century Europeans had become disillusioned with the curative properties of sassafras, and it was largely abandoned. In 1963 scientists learned that a diet containing 1 percent of a rat’s weight in sassafras oil - an extremely high dose - caused cancer and the medical community officially blacklisted it. But the southern rural culture continue to use sassafras as a flavoring. The oil is used in perfumery, root beer and candy such as licorice. In Cajan cooking any respectable file gumbo will have ground sassafras leaves for the flavoring and mucilaginous properties the ingredient imparts. But the most common use is still sassafras tea, brewed from three-inch, kindling-size pieces of dried roots. The tea is prepared by steeping two or three of the sticks in a small quantity of water and then sweetening with sugar to taste. Perhaps the tea’s appeal and calming effect is more psychological than medicinal, but its popularity is not to be denied. As a small landscape tree, sassafras is a welcome addition to any garden. It grows in full sun or light shade in most well drained sites. It is seldom found in nurseries because of the difficulty of transplanting. Bare root plants dug from the wild, even as small trees, almost always die. Container-grown trees offer the best likelihood of success but they are not commonly offered by nurserymen. By: Gerald Klingaman, retired Extension Horticulturist - Ornamentals Extension News - September 28, 2001 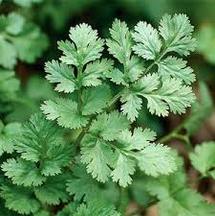 How to Grow Cilantro Cilantro needs full sun or light shade in southern zones since it bolts quickly in hot weather. It grows best in a well-drained, moist soil. Cilantro plants should be spaced about 6 to 8 inches apart. To harvest fresh cilantro all season, make successive sowings every 2 to 3 weeks starting in late spring. From the time of sowing seed, cilantro leaves can begin to be harvested in about 3 to 4 weeks. Cilantro seeds can be harvested in about 45 days. Coriander / Cilantro Coriandrum sativum Interesting Facts
Flowering Coriander for Aphid Control In the Salinas Valley of California, aphids have been one of the worst pests in the lettuce fields. The USDA Cooperative Extension Service has been investigating organic methods for aphid control, and experimented with coriander plants and Alyssum plants; when intercropped with the lettuce and allowed to flower, they attract beneficial insects such as hoverflies, the larvae of which eat up to 150 aphids per day before they mature into flying adults. The Herb Society of America www.herbsociety.org
Wikipedia 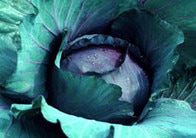 Vegetable (Cool Season) - Cabbage Family Brassica oleracea var. capitata Brassicaceae Family This cool-season crop grows best when daytime temperatures are in the 60s F. Direct-seed or transplant spring crops for fresh use in summer. Plant fall crops for winter storage or sauerkraut. How to plant:
Maintenance and care: Sow seeds indoors 6 to 8 weeks before average last spring frost. Keep soil warm (about 75 F) until germination. Then keep plants around 60 F. Provide direct sun so plants don’t get leggy. When plants are 4 to 6 weeks old, transplants into garden 12 to 24 inches apart, in rows 18 to 34 inches apart. Use closer spacings for smaller, early varieties, wider spacings for larger, late-season varieties.Can be direct seeded as soon as you can work the soil. Will germinate at soil temps as low as 40 F. Plant ½ to ¾ inch deep, about 3 inches apart. Thin to final spacings. Direct seed in summer for fall crop, or start transplants in late May and transplant in late June or early July. Plants have shallow root systems. Avoid even shallow cultivation. Mulch to protect roots, reduce weed competition and conserve moisture. Use floating row cover to protect crop from early pests. When heads are mature, they are prone to splitting in response to any stress or a rain following a dry period. Avoid splitting by choosing varieties that resist splitting, spacing plants close together (8 to 12 inches for early varieties, 12 to 16 inches for later varieties), using shovel to sever roots on one side about 6 inches from the plant, or twisting plants after heads have firmed to break some of the roots. To help reduce disease, do not plant cabbage or other cole crops in the same location more than once every three or four years. Pests: Cabbage aphids - A hard stream of water can be used to remove aphids from plants. Wash off with water occasionally as needed early in the day. Check for evidence of natural enemies such as gray-brown or bloated parasitized aphids and the presence of alligator-like larvae of lady beetles and lacewings.Cabbage root maggot - White maggot larvae tunnel in and feed on roots of plants. Damage causes wilting early on, death of plants later on. Cabbageworms - Handpick and destroy. Row covers may be useful on small plantings to help protect plants from early damage. Put in place at planting and remove before temperatures get too hot in midsummer. Flea Beetles - Use row covers to help protect plants from early damage. Put in place at planting and remove before temperatures get too hot in midsummer. Control weeds. Cutworms - Control weeds. Cardboard collars around each plant give good protection. Other pests: Cabbage loopers Slugs Nematodes Diseases: Clubroot - Locate new plants in part of garden different from previous year's location. If soil infested, add lime to raise soil pH to 7.2Purple blotch (Alternaria porri ) - Avoid wetting foliage if possible. Water early in the day so aboveground plant parts dry as quickly as possible. Avoid crowding plants, allowing air circulation. Eliminate weeds around plants and garden area to increase air circulation. Practice plant sanitation. When plants are not wet, remove and destroy affected plant parts. In autumn rake and destroy all fallen or diseased leaves and fruit. Other diseases: Cabbage yellows Black rot Black leg Varieties Browse cabbage varieties at our Vegetable Varieties for Gardeners website.Plant early, midseason and late varieties to spread out harvest. Early varieties tend not to store well. Late varieties tend to be better for storage or for making sauerkraut. Some varieties are resistant to certain diseases and insects. Varieties may vary in head size, shape (round, flat, conical) and colors (green, red or purple). Savoy cabbage has wrinkled leaves, and is sometimes classed in a different group, Brassica oleracea var. sabuada. Savoy varieties are prized for their flavor as well as their good looks. Varieties recommended for New York include: Early: Jersey Wakefield Heads Up Pacifica Tastie Midseason: Chieftain Savoy Lennox Market Prize Ruby Perfection Savoy Ace Savoy King Late: Huron Excerpt from Cornell University Growing Guide
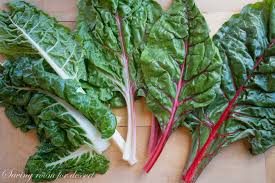 Gardeners have been growing Swiss chard since the time of Aristotle, a testament to its enduring appeal; food plants have a way of making friends when they’re colorful, nutritious, delicious, and hardy. Chard is sort of a forerunner to beets and a close cousin to spinach, close enough that in many instances it can be substituted for the latter. We’ve compiled a few suggestions here for its cultivation and storage. Types to Try White-stemmed varieties, consistently outperform their more colorful counterparts in terms of productivity and bolt resistance. Brightly colored varieties, are the queens of the edible ornamental. Varieties bearing red, pink, yellow, or orange ribs are available individually or in pre-packaged mixtures. Perpetual varieties, which are often called perpetual spinach, have thinner stems and smaller, smoother leaves than larger varieties, and they taste more like spinach. The short, stocky plants work well in small gardens and containers. Check out our chart for growing swiss chard varieties. When to Plant In spring, sow directly in the garden two weeks before your last frost date, or start seeds indoors three to four weeks before your last frost date and set seedlings out just as the last frost passes. In fall, start seeds about 10 weeks before your first frost date, and set the seedlings out when they are four weeks old. How to Plant Prepare a rich, fertile bed by loosening the soil while mixing in compost and a balanced organic fertilizer, applied at label rates. Plant seeds half an inch deep and 3 inches apart. Set out seedlings 12 inches apart. Indoors or out, thin newly germinated seedlings with cuticle scissors instead of pulling them out. Chard seed capsules often contain two or more seeds. If more than one germinates, promptly snip off all but the strongest sprout at the soil line. Gradually thin direct-sown seedlings to 12 inches apart. Pest and Disease Prevention Tips
Source:Barbara Pleasant
April/May 2009 Mother Earth News 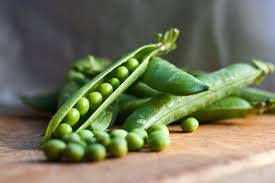 Peas are everyone's garden favorite. There's nothing like the taste of fresh sweet peas in spring. Here's some history and tips on planting peas. A Brief History of Peas: Northerners and southerners have different ideas about the meaning of the word "pea." To southerners, peas are black-eyeds, crowders and creams; to northerners, these same varieties are known as shell beans. The northern version of "peas" is known as English or green peas, and if you ask home gardeners to name their favorite vegetable, many will say green peas. Garden peas originated in western Asia and Eastern Europe. We know they existed as far back as the Stone Age, because dried pea seeds were discovered among relics in lake villages of Switzerland. Apparently 1,000 years ago the pea, which was small and dark colored, was grown only for its dried seeds. At the turn of the millennium, people started eating them fresh, too. The popularity of peas increased during the 18th century. The Anglo-Saxon word for peas was "pise," later to be called "pease," but nobody knew whether that referred to one pea or many. So, the word "peas" was coined. Because our green garden peas were derived from varieties that thrived in England, they are called "English peas." Planting Peas When you're deciding where to plant which vegetable, there are two good reasons why it's a good idea to locate your peas in a section that receives full sun:
No matter what size your garden, you'll have the best results if you plant peas in 16-inch-wide rows with walkways at least the same width. Not only will you harvest more, but you'll put less time and work into your crop. For most varieties, if you plant in wide rows there's no need to build trellises or fences for support, because the vines hold each other up. Also, wide-row vines form a living- mulch canopy that helps to eliminate weeds and keeps the soil cool and moist. When To Plant Peas Peas are a cool-weather crop that can withstand frost. Northern gardeners can often plant their first crop near the end of March, as soon as the garden has thawed and the soil can be worked. A few varieties, however, are happier being planted when it's warmer and harvested during midsummer. Seed catalogs and packets indicate the preferred time for planting different varieties. In the Far North, garden peas can be harvested almost all summer if you use a little ingenuity. Plant peas every three to four weeks for a continual summer harvest. Once you've harvested your first crop of peas, pull out and compost the vines or till them in and replant a second crop of peas in the same space. Or you can plant another short-season vegetable. In the West, gardeners can harvest peas year-round; in the South they're best if grown in the fall, winter and very early spring before the weather gets too hot. Source: National Garden Association
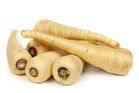 Parsnips were popular with the ancient Greeks and Romans, and have been grown in America since the first colonists brought them over from Europe. Although they take a long time to mature, their flavor is worth the wait. Parsnips are tasty by themselves, as well as in soups and stews.
Parsnips require a long growing season (100 to 130 days) to mature. They tolerate frosts and can be harvested just before the ground freezes or left in the ground over the winter. Time seed sowing for harvest just after the average first fall frost date. In areas with mild winters, you can also sow seeds in the fall from September through November. Purchase fresh seeds each year. Select a site with full sun to light shade and deep, well drained soil. Prepare the garden bed by using a garden fork or tiller to loosen the soil to a depth of 12 to 15 inches, then mix in a 2 to 4 inch layer of compost. Work soil at least a foot deep to remove rocks, clods, and other obstructions. In heavy soils, form raised beds about 4 to 6 inches high. Soak seeds for 24 hours before planting. Sow them seeds 1/2 inch deep, 2 seeds per inch in rows or beds. When planting in heavy soil, cover seeds with vermiculite so the seedlings can emerge easily. Parsnip seedlings will emerge in 2 to 3 weeks. Thin well established seedlings to stand 3 to 6 inches apart, depending upon how large you want your roots. Keep the rows weeded with shallow cultivation and water plants during the summer if rainfall is less than 1 inch per week. Parsnips are generally pest and disease free. For the best tasting parsnips, harvest before the ground freezes, but after a few frosts or leave them in the ground through the winter. If you store parsnips in the ground, cover them with a thick layer of organic mulch. Harvest immediately after the ground thaws in the spring. Source: National Garden Association |
Photo from NatalieMaynor