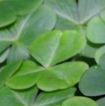
 Shamrocks have been symbolic of many things over the years. According to legend, the shamrock was a sacred plant to the Druids of Ireland because its leaves formed a triad, and three was a mystical number in the Celtic religion, as in many others. St. Patrick used the shamrock in the 5th century to illustrate the doctrine of the Holy Trinity as he introduced Christianity to Ireland.
“Wearin’ o’ the green”The shamrock became symbolic in other ways as time went on. In the 19th century it became a symbol of rebellion, and anyone wearing it risked death by hanging. It was this period that spawned the phrase “the wearin’ o’ the green”. Today, the shamrock is the most recognized symbol of the Irish, especially on St. Patrick’s Day, when all over the world, everyone is Irish for a day! The original Irish shamrock (traditionally spelled seamróg, which means “summer plant”) is said by many authorities to be none other than white clover (Trifolium repens), a common lawn weed originally native to Ireland. It is a vigorous, rhizomatous, stem-rooting perennial with trifoliate leaves. Occasionally, a fourth leaflet will appear, making a “four-leaf clover,” said to bring good luck to the person who discovers it. Grow Your Own Shamrock If you’d like to grow your own shamrock, you have a couple of options. You let the widely recognized white clover invade your lawn, or you can grow the Americanized version, Oxalis tetraphylla, the lucky clover. This is the plant you will usually find in gift shops in March. Oxalis tetraphylla is a tender perennial in most parts of this country, hardy only in USDA Hardiness Zones 8 to 9. For this reason it is usually grown as a house plant, with a winter dormancy period. It needs bright light to thrive, as well as moist, well drained soil. When the plant begins to go dormant for the winter, keep the soil barely moist, and resume regular watering in the spring when the plant puts out new growth. By: Michelle Gervais, "The History of the Shamrock." http://www.finegardening.com/article/the-history-of-the-shamrock
0 Comments
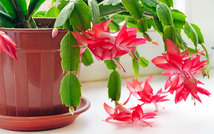 How to Grow and Care for Christmas Cactus: A Christmas Cactus is a tropical plant that does not naturally exist in nature. It was bred from two unique parent plants that both grow in the South American rain forests, specifically in Brazil. The plant is recognizable by its segmented stem and the brightly colored blooms that appear at the ends of them. Blooms are typically red, pink, purple, yellow, or white, and the blooms can occur at different times throughout the year. Most notably, they can appear near Christmas, which is where the name is derived. Since this plant is one of the rare plants that bloom at this time of year, it takes a bit of care to ensure that blooms do occur. This guide will give you all of the basics that you need to tend to a Christmas Cactus and help you make your home more colorful during the holiday season. How to Care for Christmas Cactus: Christmas Cactuses are not actually cactuses at all; in fact, they require care that is very similar to a succulent. They do not require a lot of special care, but they do need to be properly maintained in order for blooms to appear. Let’s take a look at some of the tips that will help your Christmas Cactus flourish. 1. Watering Christmas Cactus: Like most succulent plants, it requires moist soil to grow; however, these plants do not like to be sitting in a pool of water. The best way to know when your Christmas Cactus needs to be watered is to check the soil. Once the top of the soil feels dry to the touch, water it again. Too much water can cause brown spots or root rot, while too little can cause issues with the blooms. 2. Soil and Fertilizer for Christmas Cactus: Christmas Cactuses require soil that is well-draining, which means that a mixture of normal potting soil and fine bark works perfectly. You can also use sand or small stones in the base of the pot to help with drainage. Insofar as fertilizer, this plant should be fed every two weeks with a diluted liquid fertilizer. Make sure to stop feeding it about a month before the winter bloom, which typically means the end of the month of October. 3. Christmas Cactus Lighting Tips: This plant likes a lot of sunlight, but it prefers indirect light. Direct sunlight can easily burn the leaves of the plant, so windows that are facing east or north are best. A Christmas Cactus is able to adapt to low light conditions, but it thrives in bright, indirect light. 4. Re-potting and Pruning Needs: Christmas Cactus plants prefer to be confined to a snug pot where the roots are nearly too large for the pot. This lack of space for the root system actually produces the best blooms. This means that the plant will not need to be re-potted more than once every two to three years. When the transfer does need to occur, never re-pot a Christmas Cactus while it is in bloom. I have found that re-potting the plant in spring or early summer works the best, and it allows the plant time to settle before blooming for the holiday season. Pruning the plant should occur about a month after the blooming period is complete. This will encourage the plant to branch out and start growing again after a short period of rest. To prune a Christmas Cactus, simply twist the stem between the segments on the stem and remove the section. If your plant is becoming unruly, then you can remove up to 1/3 of the Christmas Cactus each year without causing damage to the plant. 5. Propagation: Propagating a Christmas Cactus is easy, all you need to do is take the trimmed sections of the plant that you cut off during the pruning process and place them in a new pot of soil to grow. For the best results, propagation should be done in the spring of the year, and at last one segment of the plant should be buried underneath the soil. 6. How to get a Christmas Cactus to Bloom: To encourage blooms to form you must create certain conditions for the plant. The temperature must be between 50 and 55 degrees Fahrenheit each night from the end of October, which is about six to eight weeks before Christmas. The room must be completely dark for 12 to 14 hours each night as well. Christmas Cactuses can be difficult plants to care for, but with a little bit of effort, you will have a delightful blooming plant right around the holiday season that your family and friends can envy. Excerpt from: Garden Lovers Club
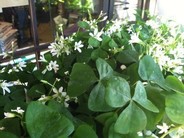 If you’re decorating for a St. Patrick’s Day party, you’ll want to include a potted shamrock plant or several shamrock houseplants. But party or not, the potted shamrock plant is an attractive indoor plant. So what is a shamrock plant? Keep reading to find out more about growing and caring for shamrock plants. The potted shamrock plant (Oxalis regnellii) is a small specimen, often reaching no more than 6 inches. Leaves are in a range of shades and delicate flowers bloom off and on during fall, winter and spring. Leaves are clover shaped and some think the plant brings good luck. These leaves fold up at night and open when light returns. Also known as the lucky shamrock plant, growing Oxalis houseplant is simple and adds a touch of spring to the indoors during winter months. Shamrock houseplants are members of the wood sorrel family of the genus Oxalis. Caring for shamrock plants is simple when you understand their periods of dormancy. Unlike most houseplants, the potted shamrock plant goes dormant in summer. When leaves die back, the potted shamrock plant needs a time of darkness to rest. Caring for shamrock plants during the period of dormancy includes limited watering and withholding of fertilizer. The dormant period when growing oxalis houseplant lasts anywhere from a few weeks to three months, depending on the cultivar and the conditions. New shoots appear when dormancy is broken. At this time, move shamrock houseplants to a sunny window or other area of bright light. Resume caring for shamrock plants to be rewarded with an abundance of the attractive foliage and blooms. When shoots appear in autumn, begin watering the newly growing Oxalis houseplant. Soil should remain lightly moist during times of growth. Water two to three times a month, allowing soil to dry out between waterings. Fertilize after watering with a balanced houseplant food. Shamrock plants grow from tiny bulbs that may be planted in fall or early spring. Most often, shamrock plants are purchased when foliage is growing and sometimes when in flower. Many cultivars of oxalis exist, but exotic varieties provide the best indoor performance. However, don’t dig a wild wood sorrel from outdoors and expect it to grow as a houseplant. Now that you’ve learned what is a shamrock plant and how to care for a growing Oxalis houseplant, include one in your indoor collection for winter blooms and maybe good luck. Source: Becca Badgett
Gardening Know How  A rubber tree plant is also known as a Ficus elastica. These large trees can grow up to 50 feet tall. When learning how to care for a rubber tree plant, there are a few key things to remember, but rubber plant care isn’t as difficult as one might think. Starting with a young rubber tree houseplant will allow it to adapt to being an indoor plant better than starting with a more mature plant. When it comes to rubber plant care, the correct balance of water and light is crucial, as with any plant. You can control the amount of light and water it gets, which is important because they shouldn’t have too much of either. Light When you have a rubber tree houseplant, it needs bright light but prefers indirect light that isn’t too hot. Some people recommend putting it near a window that has sheer curtains. This allows plenty of light, but not too much. Water The rubber tree plant also needs the right balance of water. During the growing season, it needs to be kept moist. It is also a good idea to wipe off the leaves of your rubber tree houseplant with a damp cloth or spritz it with water. If you water the rubber tree plant too much, the leaves will turn yellow and brown and fall off. During the dormant season, it may only need watered once or twice a month. If the leaves begin to droop, but not fall off, increase the water you give the rubber tree houseplant gradually until the leaves perk back up again. Once you know how to care for a rubber tree plant and it is growing well, you can begin the propagation of indoor rubber tree plants. In order to promote new leaves on a current rubber tree houseplant, cut a slit in the node where a leaf fell off. This will allow a new leaf to grow quicker. There are a couple different methods for creating new rubber tree plant cuttings. The simplest is to take a small branch from a healthy tree and put it in good potting soil or water and let it root. Another method, called air layering, is where you make a cut in a healthy rubber tree houseplant, put a toothpick in the hole, then pack damp moss around the cut. After that, you wrap it with plastic wrap to keep the moisture level higher. Once roots begin to appear, cut the branch off and plant. All these things will lead to successful rubber plant care. Source: Shari Anderson
Garden Know How 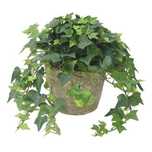 With lobed leaves and lush, trailing vines, English Ivy is a beautiful accent plant. It blends beautifully in a dish garden, adding texture to a variety of tropical plants. Ivy is a vigorous grower with strong, wiry stems densely covered with distinctive foliage. Although commonly grown as a hanging plant indoors, its aerial roots can easily be trained to climb a moss stick or trellis. There are hundreds of types of ivy varieties -- some with plain green leaves, others are variegated with yellow, gold or creamy white. Green Thumb Tip Keep this plant away from heat vents, which will dry out its leaves. Ivy thrives with moist air and soil.
Tips for Growing English Ivy House Plants
Origin: Europe
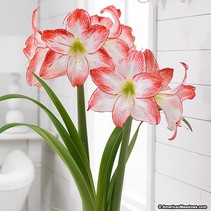 Amaryllis (Hippeastrum species) are popular for their 6 to 10 inch trumpet shaped flowers that are born on 1 to 2 foot stalks (scapes). Although red and scarlet are the most popular colors, the flowers may be pink, white, salmon, apricot, rose, bicolor or picotee (petals with a different edge color) and in both single and double forms. Because they can produce flowers in mid-winter, they are prized for the color they add to indoor landscapes. Amaryllis may be purchased as bulbs or plants, in or near bloom. Blooming plants are often given and received as gifts. Amaryllis plants should be kept out of direct sunlight while they are in flower to prolong the life of the flowers. Selecting and planting bulbs When growing amaryllis from bulbs, careful selection of the bulbs is important because the plant's performance is influenced by both the size and condition of the bulb. It is best to select the largest bulbs available as they will produce more stalks and blooms the first year. The bulbs should be firm and dry with no signs of mold, decay or injury. Select a container that is deep enough to allow adequate room for good root development and has provisions for drainage. The diameter of the pot should be about ONE inch larger than that of the bulb. Although this may seem small, amarylis bulbs prefer a smaller container. Select a potting medium that has a high organic matter, but drains well. The bulb should be positioned so that at least one-third, preferably one-half, of the bulb is above the surface of the potting medium. Firm the potting medium around the bulb, water it thoroughly and place the container in a warm, sunny spot. Do not fertilize the bulb until it begins to grow. After growth appears, it is essential to fertilize the plants regularly with a fertilizer that has high phosphorus content. Move the plant out of direct sunlight when the flower buds have begun to show color. After-flowering care The secret to successfully growing amaryllis is to keep the plants actively growing after they have finished blooming. After the flowers have faded, cut them off to prevent seed formation. Do not remove the flower stalk until it has turned yellow; it will help manufacture food that will be stored in the bulb. If the bulb does not produce a flowering stalk the next blooming period, it has not stored enough nutrients during the post-blooming period. It is important that amaryllis receive plenty of bright sunlight after they have finished blooming so place it in the brightest possible location indoors. Water the plant from the top of the container thoroughly whenever the top 2 inches of the soil is dry to the touch. Empty any excess water that drains from the pot as wet soil will promote root and bulb rot. Continue to fertilize the plant regularly. When all danger of frost is past, acclimate the plant to the outdoors by first placing it in shade or indirect light. Gradually move it to a bright garden or bed where it will receive full sun for at least 6 hours daily. Sink the pot into the soil and fertilize with a balanced houseplant fertilizer monthly to build up nutrients for flower production the next year. Amaryllis plants should be brought indoors before the first frost in the fall. Amaryllis do not require a resting period and will bloom if kept evergreen. However, blooming time can be controlled by allowing the bulb to go through a resting period. After bringing the potted plants indoors, store them in a dark place like a basement or cool closet (above freezing) and do not water. Do not remove the foliage until it has become dry and shriveled. The bulbs can be forced into bloom again after resting for 8 to 12 weeks. Inspect the bulbs periodically and bring them into light if new growth appears. If no new growth appears, they can be forced to bloom by bringing them into bright light and watering the soil thoroughly. Usually one or more flower stalks appear first, but occasionally they are preceded by leaves. Flowers usually develop in about 4-6 weeks from dormant bulbs, so they can be timed to flower at Christmas or for Valentine's Day. Amaryllis plants bloom best when they are potbound so they will require repotting only every 3 or 4 years. The best time to repot them is after they have gone through a dormant period, and you are bringing them up from the basement to reflower. Follow the same potting procedure as with a newly purchased bulb. Pests and disease Although there are several insects, mites and disease organisms that may attack amaryllis plants under greenhouse conditions, they are not as prevalent on amaryllis grown in homes. Careful inspection when purchasing bulbs accompanied by proper watering and good sanitation practices will prevent most insect infestations as well as the development of diseases. The narcissus bulb fly (Merodon spp.) may lay its eggs in the bulbs of amaryllis plants that are placed outdoors for the summer. The maggot larvae begin to feed in the outer scales of the bulb and eventually work their way into the interior of the bulb. The foliage of infested plants may become wilted, yellow and distorted and the plant will eventually die. The exterior of the bulb may appear normal, but will reveal rotting tissue when pressed. Because control is difficult, it is best to destroy any infested bulbs as soon as the pest is identified. Use of insecticides is generally ineffective. Red blotch (Stagonospora curtissi) is a fungus disease that may affect both the appearance and the health of amaryllis plants. Red spots or blotches that develop into elongated cankers with red borders may develop on the base of the flower stalks and emerging leaves. The disease is often difficult to diagnose because small red or pink patches may appear on the outside of healthy bulbs. These marks should, however, be superficial with the fleshy layers beneath white and free of markings of any kind. Although the leaves may become distorted and the flower stalks may break easily making the plants unsightly, the disease is usually not fatal to the plant. Careful inspection of bulbs and the use of sterile potting mixtures will serve as preventative measures. If the disease persists even with good cultural and sanitation practices, the bulbs can be treated with a systemic fungicide. Amaryllis require some care and attention throughout the year, but those beautiful trumpet shaped flowers are a great reward in the long months of winter. Source: Carl Hoffman
Mary Meyer University of Minnesota Extension  Latin: Euphorbia pulcherrima
Walk into any business selling groceries, discount merchandise, hardware, home supplies or plants, and you have to be careful not to trip over all of the poinsettias. This tropical flower in the spurge family is native to Mexico and has become the symbol of Christmas the world over. Like many of our common plants, it is largely an invention of the 20th Century even though it was first introduced to the United States in 1829. The poinsettia carries the common name of the person introducing it to the U.S., the first ambassador to Mexico, Joel R. Poinsett (1779-1851) from Charleston, S.C. Poinsett was an important figure in American history prior to the Civil War, serving not only as ambassador, but also as senator for South Carolina and Secretary of War during the Van Buren administration. As Secretary of War, between 1837 to 1841, Poinsett saw troops under his command involved in fighting Seminole Indians in Georgia and Florida and moving the Cherokees remaining in the East to Oklahoma Territory, a process which had begun a decade earlier. Poinsett County Arkansas, established in 1838, is named after Joel Poinsett. As senator, Poinsett led a group of politicians and founded an organization known as the "National Institute for the Promotion of Science." The group promoted the use of a 100,000-pound sterling bequest from Englishman James Smithson to develop a national museum for the relics, both industrial and natural, of the new country. This group eventually led to the establishment in 1846 of the Smithsonian Institution. The adoption of the common name "poinsettia" is due to a botanical tug-of-war that occurred between 19th Century botanists as they struggled to classify and name the plants that were coming to them from throughout the world. Robert Graham (1786-1845), a botanist in Edinburgh, Scotland, classified the plant as a new species and called it Poinsettia pulcherrima, with the new generic name honoring Poinsett and the species name translating from Latin as "very handsome" in reference to the flowers. This name was accepted by our leading botanical figure of the time, Harvard’s Asa Gray who was a friend of Graham. Meanwhile, in Berlin J. F. Klotzsch, the Curator of the Royal Herbarium, was studying the collection of an earlier German botanist, Karl Willdenow (1765-1812), who had tentatively classified the plant as a member of the genus Euphorbia. Eventually the botanists all agreed that Klotzsch was right, but by this time the name poinsettia had become entrenched as the common name for the flower. After the Civil War, the poinsettia began to appear sporadically in East Coast greenhouses around the Christmas season. It was not until the turn of the century, when the Ecke family in California began growing poinsettias as a cut flower, that it really took off and became the floral symbol of Christmas. Today, the poinsettia is the largest single horticultural crop, with between 40 and 50 million pots sold each season. The popularity of the modern poinsettia is due -- in part -- to its almost complete indestructibility. It should have as much light in the home as possible and be kept moist, but never standing in water. Allowing the plant to dry out will cause the leaves to drop. Poinsettias should be kept above 55 degrees. Even given minimal care, it should be an easy chore to keep the plant looking good until you tire of its presence on your coffee table in January. While the poinsettia is not poisonous, all plants should be kept out of the reach of toddlers that might want to go grazing on your holiday flowers. Source Gerald Klingaman, retired Extension Horticulturist - Ornamentals Extension News - December 18, 1998 |
Photo from NatalieMaynor